Monday 28 March 2016

Powertex Poppies...


Hello...and Happy Easter to you all...
and WoW...what an Easter weekend it has been, here in the UK!
Good Friday was an absolutely gorgeous day...totally Springlike, with beautiful sunshine and singing birds...Saturday and Sunday daytime wasn't so great
...THEN...
Storm Katie invited herself over!!!
Sunday night into Monday was horrendous!! She left a trail of destruction around the South, but on the scheme of things, with just minor damage to the front gate, we got away with it!
I hope you're all safe xx
-------
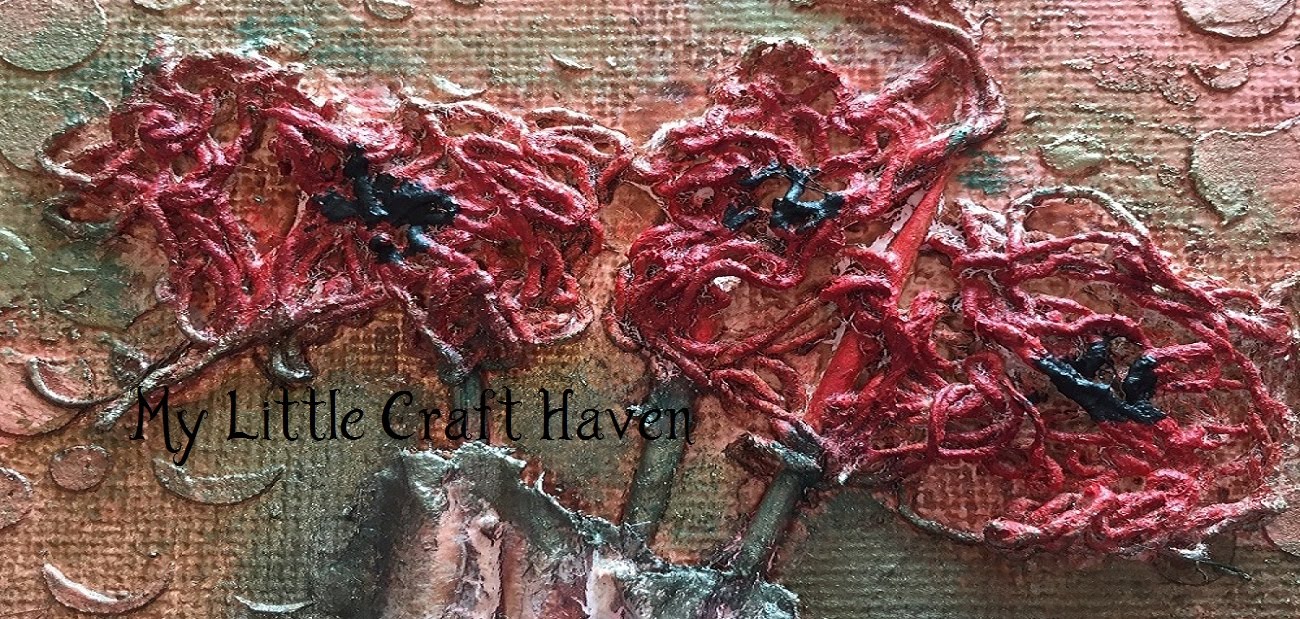
Anyways...today I thought I'd share with you a canvas I made using Powertex products.


I've brushed Ivory Powertex over the surface of the canvas.
Added  Easy Structure through a script stencil to give it some background texture.
Adhered the cotton cleaning mop threads and fabric strands using Powertex.
Brushed on some extra Ivory Powertex in places and sprayed Green Bister, which reacts with the Powertex to form wonderful crackles. 


Made some fabric poppies...dried them and coloured using Powertex Powercolour Pigments, mixed with Easy Varnish...
Added medium 3D balls to the centres, using Powertex to 'glue' them...
when dry - dry brushed Black Powercolour pigment and then a dab of Gold to finish. 


I'm just loving the Powertex products...there is soooo much you can do with them...
the only problem is finding enough hours to play! :) 

I have entered this into:

That's Crafty - Red and Green Challenge
Love to Create - Mixed Media Anything Goes


Have a great week

Happy Crafting
Lydia x


Friday 25 March 2016

Powertex for Paperartsy...


Hi all...and Happy Easter!!
I'm absolutely loving Powertex, so when  found a challenge with 'fabric sculpting medium' as a theme, I was off and running for my apron and gloves!! :)
As it's Easter and the sun is shining (for a while!) I thought I'd go for the delicate, spring look.


I used Transparent Powertex and added some Light Blue Powercolour (pigment) to change it to a lovely pale blue. 


The mannequin was coated in Ivory Powertex, as was the wooden ornamental stand.
When dry I gave the mannequin a coat of the pale blue from the bust down.


A piece of lace was dipped into the Powertex/pigment mix, and draped over her shoulders and bust.


I then added more Transparent Powertex to drop the colour tone slightly, and then coated the netting.
Added another layer of lace trim, and coated ribbon for a decorative centre drape.
When dry, I added a wooden butterfly, which had been coated in Powertex and dry brushed with Gold Colourtrix.


The hat was made from a polystyrene ball, a few layers of die cut card circles...some Paperdecoration..and the same lace ruffle that went around the mannaquin's waist.


I've then finished off the stand and her hat by dry brushing Light Blue Powercolour and Gold Pearlecsent Pigment...and added some lovely paper roses and little doves.
Lastly, I added a hand made bead pin to the top of the mannequin, and having made a hole in the underside of the hat - rested the hat on the top.


Thanks for taking a peek...and hope you like her x


I'm entering this into the Paperartsy challenge:
My inspiration came from Nicole, who had created a beautiful statue with a head wrap.


Saturday 16 January 2016

My Mixed Media Mannequin....


Morning! :)
I absolutely loved making this mannequin, and was really pleased with it! So much so, I had real troubles forcing myself to pack it up and send it off to IndigoBlu HQ! Lol
I have used some newly released IndigoBlu stamps on here, as well as some trusty old favourite products too.


The back of her wings - 
...and Kroma Crackle


The front of her wings - 


The mannequin -
coated with
Black Gee Sso Good Gesso
I have stamped with Flitterglu onto tissue, using the 
IndigoBlu Laurel Leaf Stamp...then gilded, 
and added it to the mannequin using Slap It On. Left it to dry and then 
splattered the mannequin with coordinating paint colours. 


I have stamped and gilded onto some Organza, 
and then attached it to the mannequin, draped to make a dress.
Made a fabric 'waist cape' - stamped it with Laurel leaf stamps 
using English Cottage Paint and Mega Flake.


I gilded the stick part of the stand, using 
a brand new background stamp - 


Added a few metal embellishments (which were gilded first)
and there it is! 


There are lots of new things being released soon, so keep your eyes peeled for more
news on the website, DT blogs and Facebook pages! 

I'm entering this into:

Craft Stamper - Anything Goes - Use a stamp somewhere
Simon Says Stamp - Stencil It 
Fussy & Fancy - Fashion


Have a great weekend!
Happy Crafting

Lydia xx


Sunday 10 January 2016

Where There's Light, There's Hope...


Hello! :)

Thought I'd share with you today, 
the lantern that I altered as a gift to a special friend of ours. 
---
 I forgot to take a 'just bought' picture...but it was plain...soooooo....


I gesso'd it...


added lots of DecoArt products:


Texture paste...
Crackle paste...


Media Fluid Paint...


Wethered Wood and 
more paint...


Sanded a bit here...


painted a bit there...


Added a laminated sentiment...


Or two...


and...
Ta daa......


There we have it!

I so enjoyed altering this, mainly because of the sentiment behind the project... but I just loved watching the transformation as I went along.
-----
 Look! I also have a matching drainpipe!! lol I'm not taking any credit for that though...that one's down to Mother Nature ;) x


I'm entering this into:

Pile it On - Your First Initial (L - Light/Lantern)
Word Art Wednesday - Anything Goes
Anything but Cute - Ring out the Old, Bring in the New (New lantern
That's Crafty - Winter but not Christmas


Take care all...
Happy Crafting

Lydia xx

Monday 4 January 2016

All That Sparkles - IndigoBlu Challenge

Hello again :)
Today I'm sharing my Demo Inspiration card for the IndigoBlu Challenge - All that Sparkles -
 which runs for another 16 days.
So there is still lots of time to join us...and there are the usual fantastic prizes on offer too!!


The fabulous winner’s prize this month is your choice of IndigoBlu stamps.  As always, you have 3 options to choose from:

1:   2 Large stamp plates
or
2:   4 Small stamp plates
or
3:   1 Large and 2 small plates
There’s also the Winner’s Badge, and one for the Top 3, to display proudly on your blog, and the WINNER of the challenge will also be invited to do a GUEST SPOT on a future Challenge Launch post. That’s right, your work will be on the Challenge Blog alongside the Design Team!


I am entering this into: 

The Artistic Stamper - Anything Goes
Crafter's Cafe - Square Cards
OLLCB - Girlie 
That Craft Place - Anything Goes 


Happy Crafting :) 

Lydia xx

Saturday 2 January 2016

Christmas Door Hanger


Hello...and welcome to 2016!!
I'm really not sure where 2015 went to...but it's gone! 
I didn't get very far, with Christmas cards this year...I kept distracting myself with decor projects! So I thought I'd share this one with you before it's time to pack away everything Christmas. 


Using 
IndigoBlu Black GeeSoo Good Gesso
IndigoBlu's stamp - Connor's Crown Jewels
IndigoBlu Cottage Garden Artist Quality Paint
IndigoBlu Smooth Texture Paste
IndigoBlu Textured Background Stencil
...and
IndigoBlu  Mega Flake 


I'm entering this into...

Fussy & Fancy - Happy Holidays
Emerald Creek - Celebrations Around the World 
That's Crafty - Anything Goes 
Anything but Cute - You've got Happy Mail
SanDee & Amelie - Anything Goes Steampunk/Industrial


Happy New Year...
And
Happy Crafting

Lydia xx

LinkWithin

Related Posts with Thumbnails